The complete guide for setting up your local environment
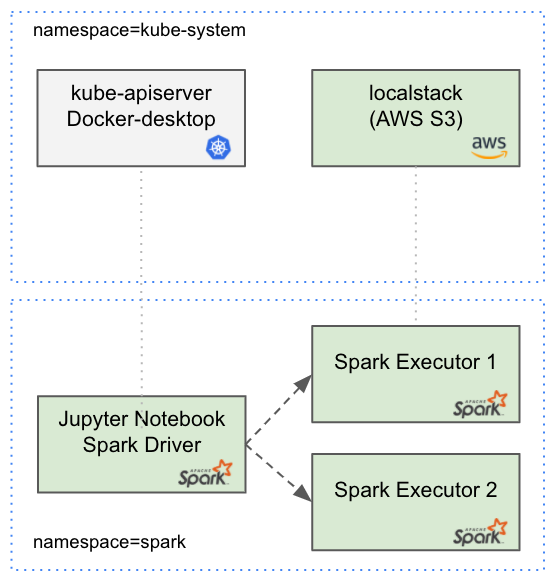
Jupyter notebook is a well-known web tool for running live code. Apache Spark is a popular engine for data processing and Spark on Kubernetes is finally GA! In this tutorial, we will bring up a Jupyter notebook in Kubernetes and run a Spark application in client mode.
We will also use a cool sparkmonitor widget for visualization. Additionally, our Spark application will read some data from AWS S3 that will simulate that locally with localstack S3.

Installation
Prerequisites:
- git (v2.30.1)
- docker-desktop (v3.2.1) with Kubernetes (v1.19.7)
- aws-cli (v2.1.29)
- kubectl (v1.20.4)
Jupyter installation:
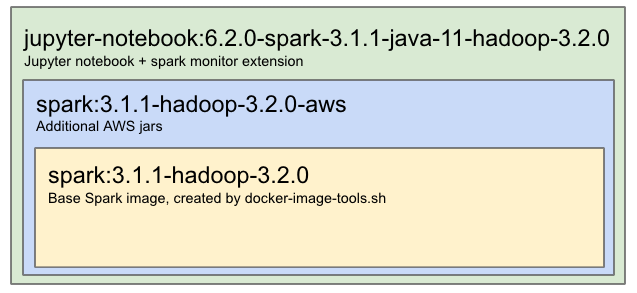
Our setup contains two images:
- Spark image — used for spinning up Spark executors.
- Jupyter notebook image — used for Jupyter notebook and spark driver.
I already shipped those images to docker-hub so you can get quickly pull them by running those commands:
docker pull itayb/spark:3.1.1-hadoop-3.2.0-aws
docker pull itayb/jupyter-notebook:6.2.0-spark-3.1.1-java-11-hadoop-3.2.0
Alternatively, you can build those images from scratch, but that’s a bit slower; please see the appendix for more information about that.
The YAML below contains all the required Kubernetes resources that we need for running Jupyter and Spark. Save the following file locally as jupyter.yaml:
https://medium.com/media/1dde58d58cae2a5f765b49c9c11a05bb/href
Next, we will create a new dedicated namespace for spark, install the relevant Kubernetes resources and expose Jupyter’s port:
kubectl create ns spark
kubectl apply -n spark -f jupyter.yaml
kubectl port-forward -n spark service/jupyter 8888:8888
Note that a dedicated namespace has several benefits:
- Security — as Spark requires permissions to create/delete pods etc. it’s better to limit those permissions to a specific namespace.
- Observability — Spark might spawn a lot of executor pods so it might be easier to track those if they are isolated in a separate namespace. On the other hand, you don’t want to miss any other application pods between all of those executor pods.
That’s it! now open your browser and go to http://127.0.0.1:8888 and run our first Spark application.
Localstack installation:
Below you can see the YAML file for installing localstack in Kubernetes:
https://medium.com/media/832996d14d945ce6a03d18a5f1ea89c3/href
Save this file locally as localstack.yaml, install localstack and expose the port by running the following:
kubectl apply -n kube-system -f localstack.yaml
kubectl port-forward -n kube-system service/localstack 4566:4566
now that we have S3 running locally let’s create a bucket and add some data inside:
https://medium.com/media/a626ceef9630edf7f6957deef3542f2e/href
Save this file locally as stocks.csv and let’s upload it to our local S3 with the following commands:
aws --endpoint-url=http://localhost:4566 s3 mb s3://my-bucket
aws --endpoint-url=http://localhost:4566 s3 cp examples/stocks.csv s3://my-bucket/stocks.csv

Run your Spark Application
On Jupyter main page click on the “New” button and then click on Python3 notebook. On the new notebook copy the following snippet:
https://medium.com/media/e24cc2aea955eb66b6fc59b0d9830289/href
and then click on “File” → “Save as…” and call it “spark_application”. We will import this notebook from the application notebook in a second.
Now let’s create our Spark Application notebook:
https://medium.com/media/5522868ad67308367fb36cf6d718ae60/href
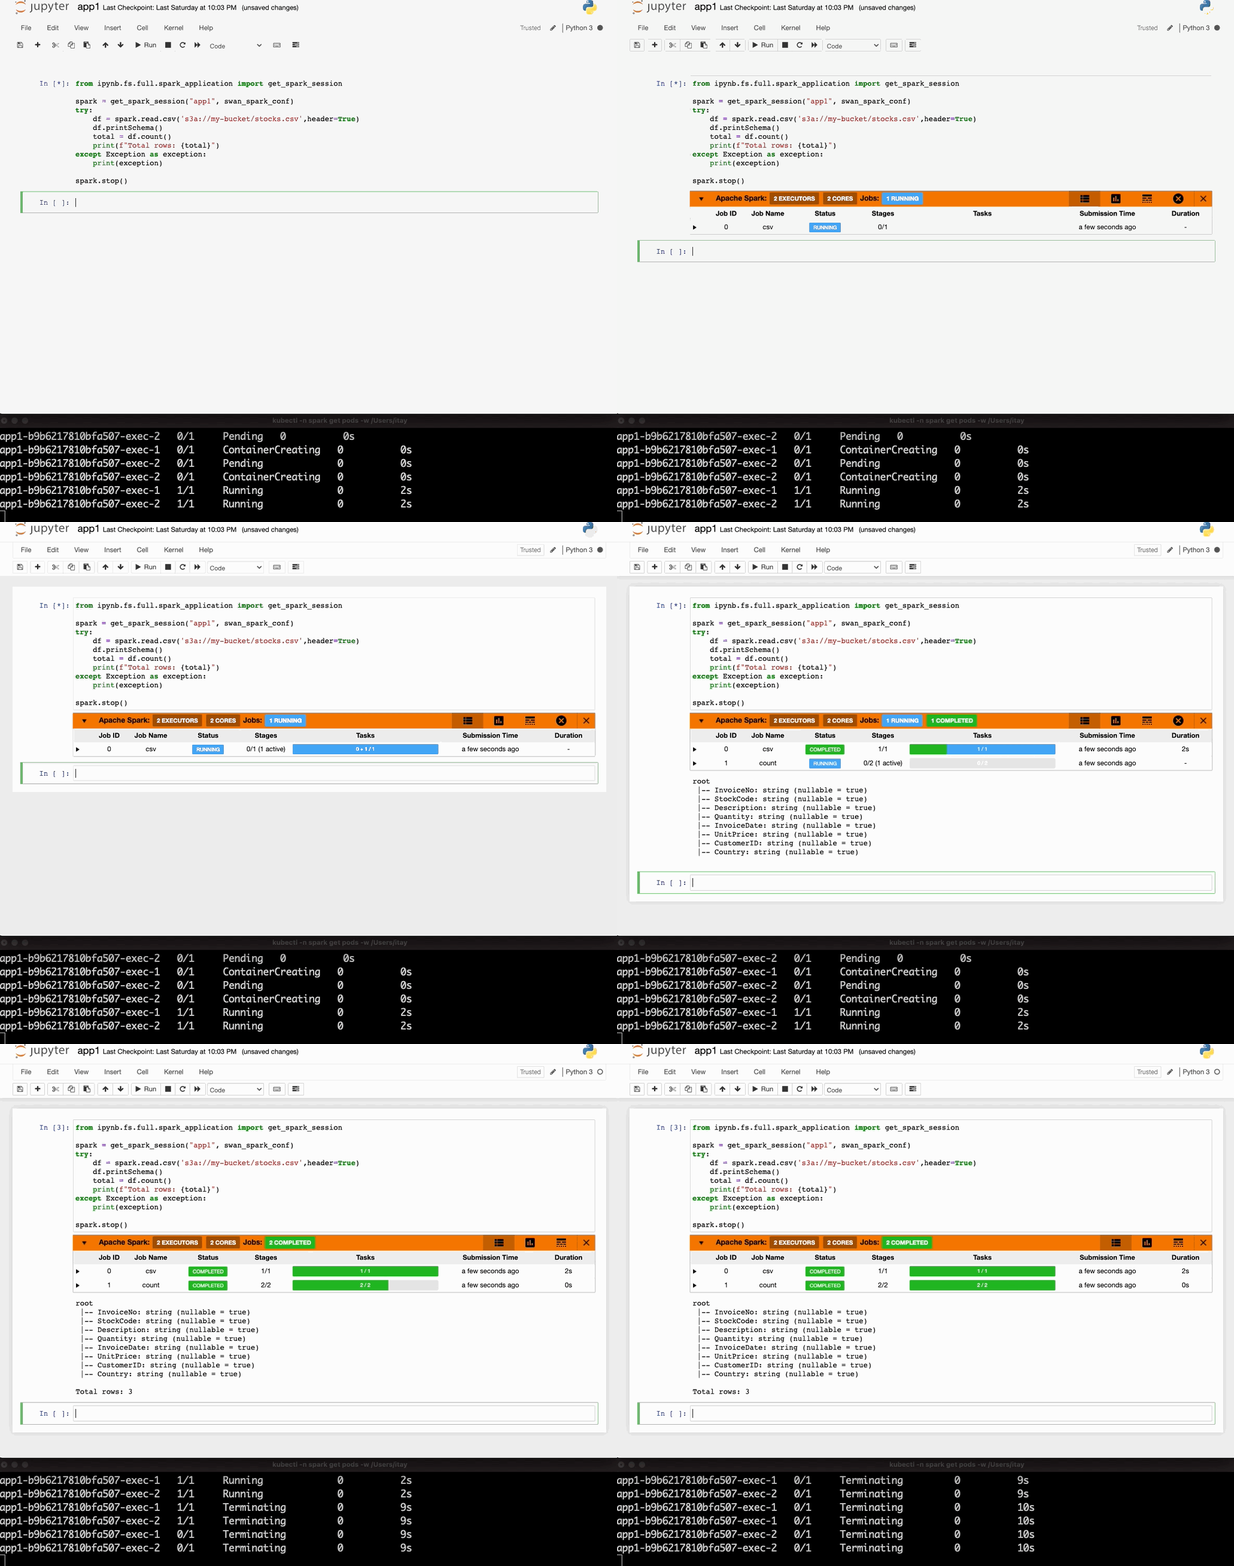
Now run this notebook and you’ll see the results!
Observations
I hope that this tutorial could help you to move forward to production. Be aware that there are several actions that need to be taken before proceeding to the production environment (especially in terms of security). Here are some of them:
- The application is wrapped within try/except block as in case of application failure, we want to ensure that none of the executors keep running. Failures might leave Spark executors running which consumes redundant resources.
- We used AnonymousAWSCredentialsProvider for accessing local S3. In production, change the authentication provider to either WebIdentityTokenCredentialsProvider or SimpleAWSCredentialsProvider.
- The following configurations were added for local work (with localstack): spark.hadoop.fs.s3a.path.style.access=true spark.hadoop.fs.s3a.connection.ssl.enabled=false
- We used root user for simplicity, but the best-practice is to use non-root user in production.
- We disabled the Jupyter-notebook’s authentication for this tutorial. Make sure your notebook is exposed only within your VPN and remove the empty token from the CMD.
- In production, you will need to give S3 access permissions for both jupyter and executors. You can use IAM roles & policies that are usually associated with Kubernetes service accounts.
- We used persistence volume to save notebooks. In production, you need to change the storageClassName: hostpath to gp2 (or whatever you’re using).
Appendix

- If you want to build your own spark base image locally you can download Spark from the main apache archive, unzip and run the build script:
wget https://archive.apache.org/dist/spark/spark-3.1.1/spark-3.1.1-bin-hadoop3.2.tgz
tar xvzf spark-3.1.1-bin-hadoop3.2.tgz
cd spark-3.1.1-bin-hadoop3.2.tgz
./bin/docker-image-tool.sh -u root -r itayb -t 3.1.1-hadoop-3.2.0 -p kubernetes/dockerfiles/spark/bindings/python/Dockerfile build
docker tag itayb/spark-py:3.1.1-hadoop-3.2.0 itayb/spark:3.1.1-hadoop-3.2.0
2. To add AWS S3 support for the spark base image above, you can build the following Dockerfile:
https://medium.com/media/b63332fc9a719f9135e6b8a261d05367/href
and build it with the following command:
docker build -f spark.Dockerfile -t itayb/spark:3.1.1-hadoop-3.2.0-aws .
3. Building the Jupyter notebook docker image, you can use the following dockerfile:
https://medium.com/media/d1a9d5929a83b4df40189acc3c0dbbc6/href
and build it with the following command:
docker build -f jupyternotebook.Dockerfile -t itayb/jupyter-notebook:6.2.0-spark-3.1.1-java-11-hadoop-3.2.0 .
Summary
We ran our first Spark on Kubernetes application together with mocked AWS S3 (localstack) in our local environment. We also used a very useful widget to monitor spark progress (by swan-cern).
Now it’s your time to write some awesome ETLs!